Mastering Roof Inspections: Wood Shakes and Shingles, Part 4
by Kenton Shepard and Nick Gromicko, CMI®
The purpose of the series “Mastering Roof Inspections” is to teach home inspectors, as well as insurance and roofing professionals, how to recognize proper and improper conditions while inspecting steep-slope, residential roofs. This series covers roof framing, roofing materials, the attic, and the conditions that affect the roofing materials and components, including wind and hail.
Fastener Types

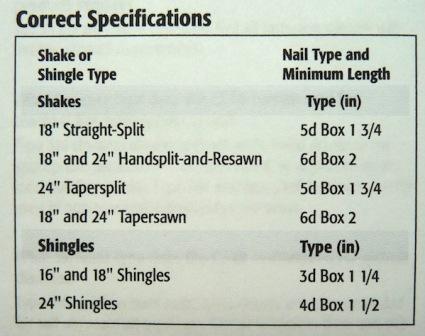
Both shakes and shingles should be installed with corrosion-resistant fasteners, such as aluminum, stainless steel or hot-dipped zinc-coated nails. Electro-galvanized, zinc-coated staples are available, but staples are not available hot-dipped.
The CSSB does not recommend the use of electro-galvanized fasteners. In coastal environments, electro-galvanized fasteners are a defective installation due to their excessively short service life.
Although staples have been widely used in the past, nails are the preferred fastener for both shakes and shingles. They should be long enough to penetrate the roof sheathing.
Some types of fasteners may not be of a material that is compatible for use with shakes or shingles that have been chemically pressure-treated. These roofs may require stainless steel fasteners. Confirmation would require checking with the manufacturer, and this lies beyond the scope of a general home inspection. However, if you know that pressure-treated products have been used, you should mention in your report that special fasteners are sometimes recommended by the manufacturer. Recommend confirmation by a qualified contractor, and disclaim responsibility for confirming the use of the proper fasteners.
Fastener Schedules
For both shakes and shingles, two fasteners only should be installed, each within 1 inch of the edge and approximately 1½ inches above the exposure line. Fasteners should never be visible or be exposed to weather.
Fasteners placed too high or too close together may encourage distortion, such as curling and cupping. You don’t want to see them in the exposure, although you will see roofs on which fasteners were installed near the butt of the shake or shingle in an effort to correct cupping or curling. This won’t work for long. Over time, the fasteners will expand and contract with changes in temperature, and they will become loose and the shake or shingle will continue to distort.
Fastener-Related Defects

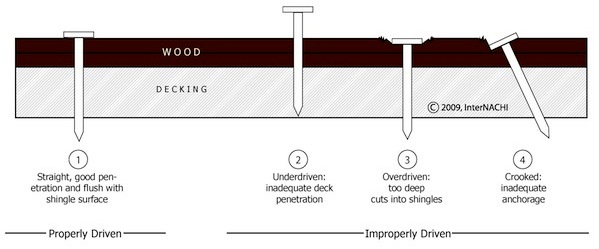
Fasteners should be driven only deep enough that the heads are flush with the surface of the shake or shingle. Over-driving the fastener will sink the head below the surface, reducing the effective thickness of the wood and, consequently, the resistance to uplift from wind. Driving the fastener at an angle can have the same effect. Under-driving the fastener will also reduce wind resistance, since the head will no longer be in contact with the wood.
Cap Shakes and Shingles

When cap shakes and shingles for ridge and hip caps have been stapled together, the staples will be exposed to weather and will fail before the staples used to fasten field shakes or shingles. Long-term expansion and contraction will cause the holes to enlarge and the shakes or shingles that form the caps will separate, exposing the underlying roof to weather and increasing the potential for leakage.
WOOD ROOF PROBLEMS
Weathering
Weathering is a general term used to describe slow deterioration from exposure to the elements, including UV radiation from sunlight, thermal cycling, moisture cycling, erosion from precipitation runoff, buffeting, and uplift from wind.
UV radiation from sunlight causes long-term deterioration of the surface of roofing materials. Newly installed cedar will turn brownish-grey.
Thermal cycling describes the cycles experienced by materials as they expand with heat and contract as they cool. Thermal cycling has little effect on shakes and shingles, but can affect metal fasteners. Over time, thermal cycling will cause fasteners to loosen in their holes so that they’ll pull out more easily, and the roofing they anchor will suffer reduced wind resistance.
Moisture cycling describes the cycles experienced by materials as they expand while absorbing moisture and shrink as they dry. If fasteners have been loosened by thermal cycling, damp, expanding shakes and shingles will grip the fastener and raise it slightly in its hole.
When the wood dries, it contracts and shrinks, leaving the fastener protruding above the surface. As time goes by, fasteners will continue to rise out of their holes. Moisture cycling also contributes to distortion, such as curling and cupping.
Moisture erosion is caused by runoff flowing down the roof. Flat-grain shakes and shingles are more likely to suffer from erosion, since they expose a greater proportion of sapwood, which is softer than heartwood. The extractives in heartwood also help resist erosion.
Runoff can eventually erode completely through weak, thin portions of shakes and shingles that have been degraded by the sun.

The area of wood just beneath the butts of shakes and shingles in courses above may suffer especially severe erosion. If wood is thin and UV radiation-damaged, erosion may wear completely through the shake or shingle, creating a hole that will typically have tapered or serrated edges. This exposes underlayment that can fail fairly quickly when exposed to UV radiation.
Extractive Bleeding

The stains below shingle butts in the photo above were caused by extractive bleeding. Extractives are chemical compounds in wood cells that help determine the wood’s permeability to liquids. They also influence the wood’s properties, such as color, density, hardness, compressive strength, and resistance to attack by insects and fungi.
Extractive bleeding can happen when tannins in wood are dissolved by moisture and then migrate to the surface as the wood dries. Rain will sometimes wash these stains away, but if left exposed to weather, the sun can cause polymerization, which will set the stain. Products containing oxalic acid seem to be the most effective at removing extractive-bleeding stains.
**************************************************
Learn how to master a roof inspection from beginning to end by reading the entire InterNACHI series: Mastering Roof Inspections.
Take InterNACHI’s free, online Roofing Inspection Course
Mastering Roof Inspections
Roofing Underlayment Types
Inspecting Underlayment on Roofs
Fall-Arrest Systems
Roofing (consumer-targeted)
More inspection articles like this

