Mastering Roof Inspections: Wood Shakes and Shingles, Part 3
by Kenton Shepard and Nick Gromicko, CMI®
UNDERLAYMENT AND INTERLAYMENT
In cold climate zones where ice dams are common, both shake and shingle roofs should have an ice barrier installed as eave protection along the lower roof edge. Even if shakes or shingles are installed on spaced sheathing, the roof deck beneath the ice barrier should be solid sheathing.
Shakes and shingles have very different requirements regarding the installation of a water-resistant membrane in the field.

Shingles
Both the CSSB and the IRC recommend that shingles in the main portion of the roof have no underlayment installed due to concerns about moisture, especially condensation. The exception is where an ice barrier is required at the eave.

The photo above shows a wood shingle roof which has had interlayment installed, which is a defective installation. This will slow drying, encourage distortion and decay, and cause the roof to fail prematurely.
Interlayment is the installation of an underlayment (typically, felt paper) between each course of shingles. Interlayment is acceptable on a shake roof, but never on a wood shingle roof. The roof in this photo, installed five years ago, needs to have all the shingles removed and new shingles installed correctly at the contractor’s expense.
Interlayment for Shakes
Shakes should never have underlayment installed except where an ice barrier is required over solid sheathing. Instead, interlayment is required. Interlayment consists of an 18-inch-wide strip of 30-pound black felt installed between courses of shakes. The bottom of the felt should be positioned above the butt of the shakes at a distance equal to twice the exposure. The interlayment should never be visible.

So, on a roof with 24-inch shakes and a 10-inch exposure (which is common), the interlayment would cover only the top 4 inches of the shakes in each course. The upper 14 inches of interlayment would rest partially on the interlayment of the course below and partially on the bare sheathing.
Interlayment acts as a weather baffle and helps prevent wind-driven snow and rain from penetrating the roof. Because shakes are usually rougher and coarser than shingles, wind-driven precipitation is more likely to penetrate shakes than shingles. Interlayment requirements may vary by area.
Waterproof Underlayment
Neither shakes nor shingles should have a waterproof underlayment installed unless the shakes or shingles are installed on a batten system, which allows for good air flow between the underlayment and the underside of the shakes or shingles.
2-Ply vs. 3-Ply
You may occasionally see shakes installed without interlayment. If this is the case, the shake installation should be 3-ply. The roof should be covered with three layers of shakes at any given point in the roof system. This is not a method approved by any existing building codes or by the CSSB, but may be approved by the local AHJ on an individual basis. Three-ply systems should use only #1 or premium-grade taper-sawn shakes. Installing interlayment on 3-ply roofs may result in trapping moisture and reducing the lifespan of the shakes.
A 3-ply roof can be installed over either spaced board or solid roof sheathing. Three-ply systems should never be used on roofs with a slope of less than 4:12.
Shake roofs installed using the 2-ply method in which the roof is covered with two layers of shakes at any given point in the roof system must have interlayment installed.
INSTALLATION
Starter Course

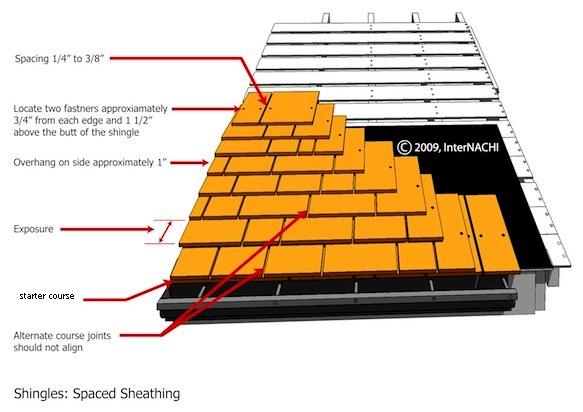
The first course of shingles can be doubled or tripled, with the joints between upper and lower shakes offset by at least 1½ inches. Shakes measuring 15 inches are made for starter and finish courses (finish courses being the courses at the peak), but are seldom used. Most installers use similar shakes and shingles for the starter and finish courses.

Projection at the Roof Edges
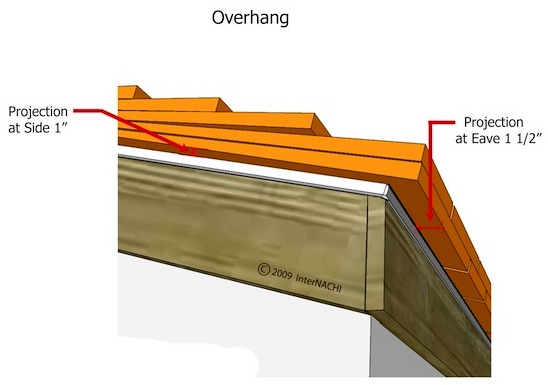
The amount of overhang at rakes and eaves should be the same for shakes and shingles: 1½ inches at the bottom, and 1 inch on the sides. Sidelaps in the starter course should be 1½ inches minimum.
Allowable Exposure
The proper exposure for both shakes and shingles is determined by the length and the grade. The exposure of a shake or shingle is that portion which is exposed to weather. So, if you look at a roof with 24-inch shakes installed and you can see 10 inches of the length of each shake, the exposure is 10 inches.
Both shakes and shingles have minimum slope requirements. According to the IRC, shakes should never be installed on roofs with slopes of less than 4:12. Shingles should never be installed on roofs with slopes of less than 3:12. But on roofs with slopes of between 3:12 and 4:12, exposures should be reduced according to shingle length and grade.

Although decreasing shake or shingle exposure is acceptable, the maximum exposure should never be exceeded. Excessive exposure lowers the roof’s resistance to wind damage and distortion from weathering.
Staggered Butts
Wood roofs are sometimes installed with butts staggered up and down. The installation should never exceed the maximum-allowable exposure when this method is used.
Field Installation
Shakes
Field shakes and shingles are all those on a roof except those in the starter course along the lower roof edge and in the finish course at the roof peak.
Spacing Between Shakes and Shingles
Wood shakes and shingles swell when they get wet and shrink when they dry. Because of the structure and orientation of wood cells, there will be more dramatic movement across the width than in the length. For this reason, it’s important to leave adequate space between shakes or shingles in the same course. Limitations on spacing may vary according to the AHJ in the area where the inspection is being performed. It’s usually the CSSB or the IRC. Spacing between taper-sawn shakes that are pressure-treated with a preservative is ¼-inch to ⅜-inch.
Shakes
For spacing between shakes in the same course:
- the CSSB recommends ⅜-inch minimum and ⅝-inch maximum; and
- the IRC recommends ⅛-inch minimum and ⅝-inch maximum.
Shingles
Spacing between shingles in the same course should be ¼-inch to ⅜-inch. Flat-grain shingles wider than 8 inches should be split in two before installation. Modern building codes require that no two joints in any three adjacent courses be in alignment.
Vertical Joint Alignment
The distance separating vertical joints between shakes and shingles in adjacent courses is called the sidelap. The minimum sidelap for both shakes and shingles is 1½ inches. This means that you shouldn’t see any shake or shingle joints in adjacent courses within 1½ inches of each other or within 1½ inches of a knot or similar defect.
On shingled roofs, knots and similar defects should be treated as the edge of a shingle and a 1½-inch sidelap should be maintained. This is because shingles are likely to split first at these defects.

When flat-grain shingles are used, joints should not align with the centerline of the heartwood because flat-grain shingles are prone to cracking along the heartwood’s centerline.
Shingle Width
The minimum width for both shakes and shingles is 3 inches. The maximum width of flat-grain shingles is 8 inches.

Sidewall Installation
As with asphalt shingles, flashing at sidewalls should be stepped flashing, not continuous flashing.

Minimum Slope
Modern building codes require a minimum slope of 4:12 for shakes and 3:12 for shingles.
**************************************************
Learn how to master a roof inspection from beginning to end by reading the entire InterNACHI series: Mastering Roof Inspections.
Take InterNACHI’s free, online Roofing Inspection Course
Mastering Roof Inspections
Roofing Underlayment Types
Inspecting Underlayment on Roofs
Fall-Arrest Systems
Roofing (consumer-targeted)
More inspection articles like this

