Inspecting Evaporative Cooling Systems
According to InterNACHI’s Home Inspection Standards of Practice, a home inspector is required to inspect the cooling system, using normal operating controls. Let’s look at the different components of evaporative cooling systems, as well as the key facts to remember when installing or inspecting them. A better understanding of evaporative cooling systems can help home inspectors complete inspections of new builds and existing homes with more accuracy.
Evaporative coolers can be an effective and less expensive alternative to compressor-based air conditioners for cooling homes in dry climates. Evaporative coolers (also known as swamp coolers) use evaporation and blowing air to cool. Home inspectors should note that they can use about one-fourth the energy of central air conditioners and cost less than half the price to install and operate. Evaporative coolers work best in dry climates where the outdoor relative humidity during the cooling season is less than 50%.
The evaporative cooler is a fairly simple device consisting of a box-like housing that contains a large blower fan and an 8- to 12-inch-thick sponge-like filter made of treated cellulose, fiberglass, plastic foam, or shredded aspen fibers, that is constantly soaked with water from a sprayer and recirculating pump located in the unit. The blower fan pulls in outside air and blows it through the filter and into the building. The flowing air evaporates some of the water, giving up heat in the process, which can reduce the temperature of the air entering the home by 15° to 40°.
The incoming air is not recirculated inside the house but is blown through the house and must have a way to exit. When operating, evaporative coolers bring in enough fresh air to completely replace house air every two to three minutes. For the system to work properly, home inspectors should note that doors or windows must be opened to provide a path for the air to exit. Alternatively, ceiling exhaust vents can be installed. These typically exhaust directly into the (vented) attic, which is something home inspectors can check for. The exhaust vents usually come with a barometric damper that automatically opens when the cooler is on. They may also have a mechanically-controlled damper so they can be closed during the heating season, or if the home is also equipped with refrigerant air conditioning. For every 1,000 CFM of air delivery, 2 square feet of unrestricted air relief is required (PG&E 2004). Because the air will tend to flow to open outlets, some zoning of cooling can be achieved by opening windows or vents in those rooms where cooling is desired.
An evaporative cooler should have at least two speeds and a vent-only option. The vent-only operation allows the unit to be used as a house fan during mild weather. Unlike refrigerant cycle-based air conditioning, evaporative coolers increase rather than decrease the humidity in the air.
The cooler can be installed to blow air directly into a central location in the home, or it can be connected to ductwork to distribute the air to different rooms. Central-location installations work well for compact homes with open floor plans. Ducted systems are required for larger houses with hallways and multiple bedrooms. The style and size of the home should be noted by home inspectors. Down-flow systems, which are mounted on the roof and connected to a duct system in the attic, are the most common installation. However, ground- or wall-mounted units are preferred because they eliminate the risk of roof leaks and they're much easier to access for maintenance.
Evaporative coolers require regular maintenance to keep the water reservoir clean and odor-free. Maintenance should be done at least twice a year: when the unit is first started up in the spring, and when it is shut down for the season. This is something home inspectors can inform homeowners about. In the spring, the filter media should be cleaned or replaced, the belt inspected for proper tension, and the cabinet cleaned and inspected for damage. In the winter, the water line should be shut off, the pan should be drained and cleaned, and a winter cover should be installed to prevent dirt and dust from getting inside the unit. During the cooling season, the drain pan should be emptied whenever the cooler will be idle for more than a few days because standing water left in the pan can become a breeding ground for mosquitoes and bacteria, including Legionnaires' Disease.
If the local water supply has a high mineral content, a bleed-off valve can be installed in the recirculating line to drain off water and reduce mineral concentrations; however, this can increase water usage by 10% to 50%. A more efficient alternative is to install an autoflush system (also called a dump pump) that empties the cooler pan and brings in clean water at regular intervals (e.g., every eight to 12 hours of operation) to reduce mineral buildup.
Although evaporative coolers are typically less expensive to purchase, install and operate, their water usage and water costs must be taken into account. Annual water use varies based on the number of running hours and the dryness of the air. For example, for a 1,500-square-foot home, the annual water usage for an evaporative cooler without a bleed-off valve could range from 2,980 gallons in Santa Fe, to 7,261 gallons in Albuquerque, to 12,457 gallons in Las Cruces, New Mexico. Increase these numbers by 50% if the cooler has a bleed-off valve (SWEEP 2007).
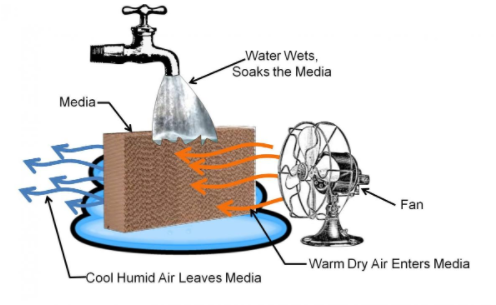
Figure 1. Concept behind an evaporative cooler – warm air is cooled as the air passes through a wet medium and gives up some of its heat to evaporate the water (image courtesy of CalcsPlus).

Home inspectors can take note that the single-inlet direct evaporative coolers of today are more efficient than their "swamp cooler" counterparts of years ago. Their cooling effect is dependent on the temperature difference between the dry-bulb and wet-bulb temperature (wet-bulb depression) of the entering air, the velocity of the air moving through the medium, and the quality and condition of the medium itself.
Newer
evaporative coolers have thick media with efficiencies or cooling effectiveness of 75% to 93%. For example, a 12-inch-thick medium can have an efficiency of
90% or better. The cooling effectiveness or efficiency of evaporative
coolers is a measure of how closely the supply air temperature leaving the
evaporative cooler approaches the outdoor wet-bulb temperature.

Figure 3. A modern single-inlet direct evaporative cooler draws outside air through an 8- to 12-inch media filter. The air releases heat as it evaporates water in the medium (image courtesy of CalcsPlus).
When outdoor temperature is measured, it is usually the dry-bulb (DB) temperature, which is the temperature of the air measured using an ordinary thermometer. Wet-bulb (WB) temperature is measured with a thermometer that has a wet sock or cloth wick wrapped around the bulb (see Figure 4). As the water in the sock evaporates, the sock loses heat and cools the sensing bulb, bringing the thermometer reading down to the wet-bulb temperature. The wet-bulb temperature is the lowest temperature that can be reached through evaporation; the more humid the air, the higher the wet-bulb temperature. The local wet-bulb temperature can also be determined from local weather information (the dry-bulb temperature and relative humidity or RH) with the help of a psychrometric chart. The temperature difference between the dry-bulb thermometer and wet-bulb thermometer is dependent on the amount of water vapor in the ambient air. Home inspectors should keep this in mind when inspecting evaporative cooling systems.

Figure 4. The thermometer on the left is a common thermometer used to measure dry-bulb temperature. The same thermometer can be used to measure wet-bulb temperature by attaching a wet sock or wick to the bulb of the thermometer (image courtesy of CalcsPlus).
When the wet-bulb temperature is equal to the dry-bulb temperature, the relative humidity is 100%. If the relative humidity is lower than 100%, the wet-bulb temperature will be lower than the dry-bulb temperature. The difference between the wet-bulb temperature and the dry-bulb temperature is known as the wet-bulb depression. Home inspectors should note that the greater the wet-bulb depression, the better an evaporative cooler works.
For this reason, evaporative coolers work well in arid regions of the country, such as the Southwest. For example, according to ACCA Manual J Table 1, Phoenix, Arizona, has an outdoor dry-bulb (1% cooling design) temperature of 108° F, and a coincidental wet-bulb temperature of 70° F. Based on those temperatures, the wet-bulb depression is 38° F (108 – 70 = 38). In such outdoor conditions, evaporative coolers work very well. However, in Sarasota, Florida, where the outdoor temperature is 92° F and the coincidental wet-bulb temperature is 79° F, the wet-bulb depression is only 13° F (92 – 79 = 13). In this location, an evaporative cooler would not work well. Home inspectors should familiarize themselves with their service area's average wet-bulb and dry-bulb temperatures for accurately inspecting cooling systems.
If
the dry-bulb and wet-bulb temperatures are known, as well as the filter manufacturer’s efficiency rating for the medium, it would be possible to
calculate what the incoming air temperature is likely to be. For example, if
the outside air’s dry-bulb and wet-bulb temperatures are 105° F and 60° F, respectively, the
wet-bulb depression would be 45° F (105 - 60 = 45). If the single-inlet
evaporative cooler is using a medium that's rated at 90% efficient, the discharge air
temperature should be 64.5° F [105 - (45 x 0.9)].
Evaporative Coolers: Cooling Effectiveness
Home inspectors should note that evaporative coolers are not measured in seasonal energy efficiency ratio (SEER), which is the efficiency measurement used for compression cooling systems, and there's no national or international testing organization for rating evaporative coolers, although some guidance for testing is available. Instead, manufacturers refer to the cooling effectiveness of evaporative coolers, which is a measure of how close the supply (leaving) air temperature is to the outdoor (entering) wet-bulb temperature. If the supply air temperature were the same as the outdoor wet-bulb temperature, the cooling effectiveness would be 100%.
The formula used to calculate cooler effectiveness is:

Where:
e = the cooling effectiveness of the cooler
TDB = the outdoor dry-bulb temperature
TWB = the outdoor wet-bulb temperature
SAT = the supply air temperature leaving the evaporative cooler
Note: TDB – TWB = the wet-bulb depression
EXAMPLE:
An evaporative cooler that is delivering conditioned air into the home at 74° F, when the outdoor conditions are 108° F dry-bulb and 70° F wet-bulb, would have the following cooling efficiency:

In this example, the cooler’s efficiency is 89%, which would be considered an efficient evaporative cooler.

Figure 5. Average wet-bulb temperatures
across the United States (image courtesy of SWEEP).
The
chart in Figure 6 below shows the cooling temperatures that an evaporative cooler can
provide at outdoor temperatures ranging from 75° F to 125° F at 2% to 80%
relative humidity. The numbers in blue represent the ideal cooling temperatures
achievable across these conditions.
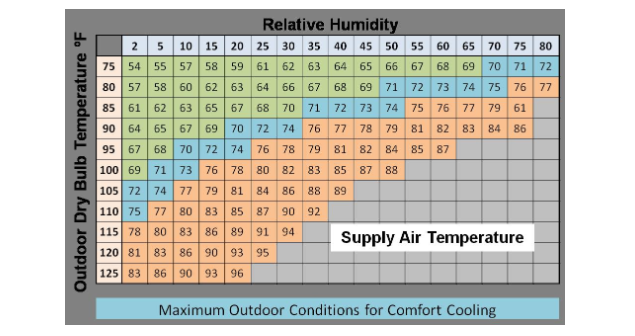
Figure 6. Cooling air temperatures
that can be achieved by a direct evaporative cooler at various outdoor
conditions (image courtesy of CalcsPlus).
The
following is an example of how wet-bulb temperature impacts an evaporative
cooler’s cooling ability. On a day when the outdoor temperature is 100° F dry
bulb at 10% relative humidity (63° F WB, according to a psychrometric
chart), the supply air entering the home will be 73° F DB, which is a 27° F DB
temperature drop. However, if the outdoor temperature is 95° F DB at 50% RH
(79° F WB), the supply air temperature will be 84° F DB (only an 11° F DB
temperature drop).
System Sizing
Sizing an evaporative cooler is not an exact science. Evaporative coolers are sized by air flow, and not by tons of cooling. Common evaporative cooler sizes range from 3,000 to 6,500 cfm (cubic feet per minute).
Most manufacturers call for something like 20 to 40 air changes per hour (ACH) through the conditioned space, depending on location and outdoor conditions. The map in Figure 7 is a simplified version of the map in Figure 5 and shows the air changes per hour that an evaporative cooler would have to produce in order to provide comfort at that region’s average wet-bulb temperature at 1% summer design conditions (i.e., the outdoor temperature that will be exceeded only 1% of the time in a given year).

Figure 7. Evaporative cooler sizing
in ACH based on wet-bulb temperatures at 1% summer design conditions (image
courtesy of CalcsPlus).
To determine the right size in cfm for an evaporative cooler system:
- Consult the ACH Zone Map shown in Figure 7.
- Determine the cubic feet (cu. ft. or CU FT) of the space to be conditioned.
- Multiply the house volume by regional ACH and divide by 60.
For example, according to the zone map, a 2,000-square-foot home with 8-foot ceilings located near Salt Lake City, Utah, should have an evaporative cooler sized to provide 20 ACH. The volume of the conditioned space of the home is 16,000 cubic feet (2,000 x 8). So, the formula would look like this: (16,000 x 20) ÷ 60 = 5,333 cfm.
Newer Technologies
Indirect coolers use an
air-to-air heat exchanger so they don’t add humidity to the cool air (see Figure
8). The main blower fan supplies outside air that is cooled by passing through
the heat exchanger as it is drawn into the home. A secondary fan draws exhaust
air from the home and/or outside air through wet media filter pads, providing cool air,
which takes heat from the incoming supply air as the two air flows cross paths
in the heat exchanger.

Figure 8. Indirect evaporative
coolers pass outdoor air through a heat exchanger that is cooled by evaporative
cooling. The moist air is exhausted out while cooled dry air is blown into the
space (image courtesy of SWEEP).
Indirect/direct
coolers cool in two stages. In the
first stage, the air passes through an indirect heat exchanger, which lowers
the temperature without adding humidity. The air then enters the second direct
cooling stage, where it flows through wet pads just like a direct evaporative
cooler, to be further cooled and humidified before flowing into the home.
Because the air has been pre-cooled in the first stage, when it leaves the
second stage, it is cooler and has less moisture than the air leaving the
single-stage unit. This technology achieves evaporative cooling efficiency of
95% or greater (PG&E 2004). One model developed by Building America
partner Davis Energy reportedly provides up to 5 tons of cooling while using
less than 1,600 watts.

Figure 9. The indirect/direct cooler’s blower passes outside air through the dry side of a heat exchanger with a 14-inch-thick media. The heat exchanger indirectly cools the air without adding moisture, then passes the air through a direct cooling module before directing it into the home (image courtesy of SWEEP).
Another innovative evaporative technology is the water-cooled evaporative condenser, which is a scaled-down residential version of the 250-ton chillers used on commercial buildings. Inside the housing, a mist of water is continually sprayed on the condenser coils to remove heat from the refrigerant and, at the same time, reduce the work of the compressor. Unlike traditional air conditioners, which use 10% more power for each 10° increase in temperature above 95° F, an evaporative-cooled condenser draws the same power over a wide range of outdoor temperatures. It uses about half the energy of conventional air-cooled condensing units. One model has an EER of 17 at 95° F (German et al. 2012).
Evaporative coolers have been developed that use photovoltaic (PV) panels to create the electricity used to run the blower and the water pump. For hot desert areas, the combination of evaporative cooling and solar power is a perfect match: the afternoon, when the most solar energy is available, is also the hottest part of the day when cooling is most needed. And because evaporative coolers use a fraction of the energy of air conditioners, PV cells can provide enough electricity to run the system effectively (SWEEP 2007).
How Professionals Install Evaporative Coolers:
- Select the most efficient model the project can afford. Consider newer types of evaporative coolers, including indirect/direct evaporative coolers.
- Select a model with a cover to minimize maintenance during the off-season.
- Install on the ground or wall, rather than the roof, in order to make maintenance easier for the homeowner.
- Install in a central location for the best air distribution. If there is ductwork, size according to the ACCA Manual D.
- Install ceiling vents with barometric and mechanical dampers.
Summary
Evaporative coolers can be an effective and less expensive alternative to compressor-based air conditioners for cooling for homes in dry climates. Home inspectors should note that they can use about 25% of the energy that central air conditioners use and cost less than half the price to install and operate. The style and size of the home should be noted by home inspectors.
Home inspectors should also remember that evaporative coolers are not measured in SEER bit by their cooling effectiveness, which is a measure of how close the supply (leaving) air temperature is to the outdoor (entering) wet-bulb temperature. If the dry-bulb and wet-bulb temperature is known as well as the medium manufacturer’s efficiency rating for the medium, the temperature of the incoming are can be calculated.
This article was sourced from the U.S. Department of Energy and InterNACHI®.
