

Asphalt Shingle Roof #2
Inspection Guide
This guide for the House of Horrors® in Boulder, Colorado, is currently being produced for self-guided tours.
The guide is based on and refers to the most recent International Residential Code (IRC), which can be found online at https://codes.iccsafe.org/public/collections/I-Codes.
STANDARDS OF PRACTICE
The International Standards of Practice for inspecting the roof system is located at www.nachi.org/sop.
MASTERING ROOF INSPECTIONS
To learn about inspecting asphalt shingle roofs, please visit Mastering Roof Inspections.
DESIGNED TO SHED

Asphalt shingles are designed to be layered. And the layering is designed to shed water. An asphalt shingle roof is designed to be water-resistant -- not waterproof. A shingle roof essentially relies on the slope of the roof to shed the water.
REINFORCED
Asphalt shingles are reinforced. They are referred to either "organic-reinforced asphalt shingles" or "glass-fiber-reinforced asphalt shingles." Most of the shingles in the North America are "glass-fiber reinforced."
Observation

The shingles should by lying flat and adhered to each other.
There is a roofing nail that has backed out and is now lifting a shingle tab.
Observation

There is a shingle of a different color, style and size. The color does not match, which is a cosmetic issue. However, it is also the incorrect size. Too wide. And it is creating an irregular offset of the shingles in the row.
Observation

The shingle of a different color, style, and size is not fastened at all.
Observation

There is a lot of debris and loose granular crushed rock material in the gutter. This may be an indication of the shingle surface condition or a repair/replacement in the past. The gutter may need to be cleaned.
Observation

There is a damaged shingle tab with a hole that passes through the shingle material.
OFFSET PATTERN
The asphalt shingles should be installed with an offset pattern according to the shingle manufacturer's installation recommendations.
Observation

The 3-tab shingles are not installed in an offset pattern as recommended by the shingle manufacturer.
It is a common installation procedure to create an offset pattern for the installation of asphalt shingles.
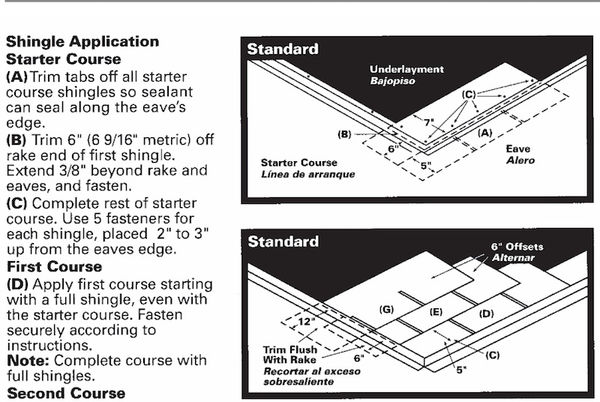
STARTER STRIP
The starter strip functions to help shed water off the roof at the eaves and rake areas. By adhering to other shingles, the strip also adds strength to the shingles layer above. The starter strip also provides a nice looking, straight edge at the eave and rake areas.
Observation

The shingle manufacturer requires a starter strip to be installed along the eaves.

The starter strip on the roof is incorrectly installed. It's upside down. The adhesive strips should be facing upwards.

The starter strip is also required to be secured with 5 fasteners, placed 2 or 3 inches up from the eaves edge. But only a few fasteners were installed, and they were installed in the incorrect location.

Six inches were to be cut and removed from one end of the starter strip, so that there is an offset with the full shingle above it, but this was not done. As you can see, the opening between two shingles is improperly positioned directly above the opening between to starter strips. This condition of having no offset pattern will allow water to penetrate the roof shingle layer and the starter strip.
Installation conditions were easily observed prior to the shingles being installed.
Observation

The shingle manufacturer requires a starter strip to be installed at the eaves.
The starter strip on the roof is incorrectly installed. It's upside down. The adhesive strips should be facing upwards.
The starter strip is also required to be secured with 5 fasteners, placed 2 or 3 inches up from the eaves edge. But only a few fasteners were installed, and they were installed in the incorrect location.
Six inches were to be cut and removed from one end of the starter strip so that there is an offset with the full shingle above it, but this was not done.
Installation conditions were easily observed prior to the shingles being installed.
There is an exposed nail head at the left-side step flashing.
Observation

There is a fastener installed on the adhesive strip. This is improperly installed. The nailing area of the shingle is below the adhesive strip.
Observation

There is a fastener exposed between two shingle tabs.
NAIL PENETRATION
The fastener should be long enough to penetrate through the roofing materials, and at least 3/4 of an inch into the roof sheathing. If the sheathing is less than 3/4 of an inch thick, the nail should go through the sheathing.
Observation
It is very difficult to see the fasteners from the other side of the roof sheathing. It may be visible from the attic access area.
SLOPE
Asphalt shingles should be used only on roofs that are 2:12 or greater in slope. Asphalt shingles should not be installed on roofs with slopes less than 2:12. For roof slopes from 2:12 to up to 4:12, a double layer of underlayment should be applied.
Observation

For slopes 2:12 up to 4:12, the underlayment should be two layers applied with a 19-inch strip of underlayment felt parallel to and starting at the eaves. Starting at the eave, applied 36-inch-wide sheets of underlayment, overlapping successive sheets by 19 inches.
For slopes 4:12 or greater, underlayment is one layer applied in a shingle fashion, parallel to and starting from the eave and lapped by 2 inches. End laps should be 4 inches and offset by 6 feet.
Slope vs. Pitch
Home inspectors should use the term "slope" when describing the roof slope. To learn more about the difference between "slope" and "pitch," visit www.nachi.org/roof-slope-pitch.
UNDERLAYMENT
Observation

The underlayment is asphalt saturated organic felt complying with ASTM D-4869 standard. According to 2015 IRC R905.2, the underlayment for asphalt shingle can be ASTM D-4869, Type I, #15 for winds under 140 mph.
For slopes 2:12 up to 4:12, the underlayment should be two layers applied with a 19-inch strip of underlayment felt parallel to and starting at the eaves. Starting at the eave, applied 36-inch-wide sheets of underlayment, overlapping successive sheets by 19 inches.
For slopes 4:12 or greater, underlayment is one layer applied in a shingle fashion, parallel to and starting from the eave and lapped by 2 inches. End laps should be 4 inches and offset by 6 feet.
Observation


The underlayment was not installed properly. It was installed in the incorrect orientation. The underlayment should be installed in a shingle pattern, lengthwise along the eave's edge.
Observation


The underlayment was inadequately fastened to the deck sheathing. You would be able to observe this condition only before the shingles are installed.
According to 2015 IRC R905.2, underlayment should be fastened sufficiently to be held in place. If the maximum design wind speed is greater than 140 mph, then there are certain fastener requirements, including corrosion resistant fasteners of metal or plastic cap nails (see above image) or cap staples must be applied in a certain grid pattern.
DRIP EDGE
According to 2015 IRC R905.2, a drip edge must be installed on the roof.
Observation

The drip edge is actually a soffit vent.
KICK OUT FLASHING
Observation

Kickout flashing is installed properly. The first piece is the actual kickout flashing. It's positioned to divert the water draining down the roof and kick it out from the wall and into the gutter.

Step flashing is installed next. The bottom edge is tucked into the inside corner of the kickout. The bottom edge of the step flashing will now be positioned properly for the first row of shingles to be installed at the eaves.

The first row of shingles are installed and cover the step flashing. The bottom corner of shingle is tucked into the inside corner of the kickout flashing.

The first row of shingles is installed. The bottom corner of the shingle is tucked into the corner of the kickout flashing.
The next row of shingles will be installed in order to provide a 5-inch exposure of the shingle.
The bottom edge of the step flashing should be installed about 5.25 inches up from the bottom edge of the shingle, so that the next row of shingles will cover the fastener and the step flashing.
FLASHING
Observation

The vent pipe penetrating through the roof surface is actually a toilet plunger. This is an incorrect and unreliable installation.
Observation

The vent pipe penetrating through the roof surface is too small in diameter. Waste state vent pipes must be at least 1 and 1/2 inches in diameter.
Observation

There is a section of the step flashing that is installed incorrectly. The flashing pieces are not installed in a shingle pattern that diverts water away from the wall.
Observation

There is a section of the step flashing that is installed without fastening. Loose step flashing.
Observation

There is a piece of the step flashing that is installed without properly-positioned fastening. There is a roof nail installed so that the nail head tries to hold down the step flashing in place. This is unreliable and incorrect. Best practice is to fasten the step flashing with a roof nail high on the upper portion of the flashing piece onto the side wall.
10 STEPS TO PERFORMING A ROOF INSPECTION
There are ten steps to performing a roof inspection on an asphalt shingle roof.